环境信息
- docker
- mysql 8.0.25
- canal 1.1.5
- canal-admin 1.1.5
- canal-adapter 1.1.5
- elasticsearch 7.3.0
环境搭建
mysql
修改 my.ini,开启 binlog
1
2
3
4
| [mysqld]
log-bin=mysql-bin
binlog-format=ROW
server-id=1
|
使用 docker-compose 启动 mysql
1
2
3
4
5
6
7
8
9
10
11
12
13
14
15
16
| version: "3"
services:
db:
container_name: mysql8
image: mysql:8.0.25
command: mysqld --default-authentication-plugin=mysql_native_password --character-set-server=utf8mb4 --collation-server=utf8mb4_unicode_ci
environment:
MYSQL_ROOT_PASSWORD: root
MYSQL_DATABASE: user
MYSQL_ALLOW_EMPTY_PASSWORD: "yes"
ports:
- "3306:3306"
volumes:
- "./data:/var/lib/mysql"
- ".my.cnf:/etc/mysql/conf.d/my.cnf"
|
elasticsearch
使用 docker-compose 搭建一个单机版的 es,并且启动 kibana 控制台方便一会操作
1
2
3
4
5
6
7
8
9
10
11
12
13
14
15
16
17
18
19
20
21
22
23
24
25
26
27
28
29
30
31
32
33
34
35
36
37
38
39
| version: "3"
services:
node01:
image: docker.elastic.co/elasticsearch/elasticsearch:7.3.0
container_name: node01
environment:
- node.name=node01
- cluster.name=es-cluster-7
- discovery.type=single-node
- "ES_JAVA_OPTS=-Xms1024m -Xmx1024m"
ulimits:
memlock:
soft: -1
hard: -1
volumes:
- es-data01:/usr/share/elasticsearch/data
ports:
- 9200:9200
networks:
- es-network
kibana:
image: docker.elastic.co/kibana/kibana:7.3.0
environment:
ELASTICSEARCH_HOSTS: http://node01:9200
ports:
- 5601:5601
networks:
- es-network
depends_on:
- node01
volumes:
es-data01:
driver: local
networks:
es-network:
driver: bridge
|
kibana.yml
1
2
| elasticsearch.url: "http://es:9200"
server.host: "0.0.0.0"
|
canal-admin
下载 canal-admin 的运行脚本
1
| wget https://raw.githubusercontent.com/alibaba/canal/master/docker/run_admin.sh
|
执行 canal_manager.sql 初始化 canal-admin 的数据表
启动 canal-admin
1
2
3
4
5
6
7
| sh run_admin.sh -e server.port=8089 \
-e canal.adminUser=admin \
-e canal.adminPasswd=123456 \
-e spring.datasource.address=docker.for.mac.host.internal:3306 \
-e spring.datasource.database=canal_manager \
-e spring.datasource.username=root \
-e spring.datasource.password=root
|
访问http://localhost:8089/ 密码是 admin/123456
canal
创建一个专用的 canal 账号
1
2
3
| CREATE USER canal IDENTIFIED BY 'canal';
GRANT SELECT, REPLICATION SLAVE, REPLICATION CLIENT ON *.* TO 'canal'@'%';
FLUSH PRIVILEGES;
|
下载 canal 启动脚本
1
| wget https://raw.githubusercontent.com/alibaba/canal/master/docker/run.sh
|
运行 canal
1
2
3
4
5
6
| sh run.sh -e canal.admin.manager=docker.for.mac.host.internal:8089 \
-e canal.admin.port=11110 \
-e canal.port=11111 \
-e canal.metrics.pull.port=11122 \
-e canal.admin.user=admin \
-e canal.admin.passwd=6BB4837EB74329105EE4568DDA7DC67ED2CA2AD9
|
canal 启动成功之后登陆 canal-admin 创建一个 example 的 instance 一会会用到
一个 instance 对应一个 mysql 实例

canal-adapter
canal-adapter 官方没有提供镜像,这里我们自己做一个。
Dockerfile
1
2
3
4
5
6
7
| FROM openjdk:8-jre-alpine
RUN echo "Asia/Shanghai" > /etc/timezone
ADD canal.adapter-1.1.5.tar.gz /opt/canal/adapter/
WORKDIR /opt/canal/adapter
ENTRYPOINT ["sh", "-c", "sh bin/startup.sh && tail -F logs/adapter/adapter.log"]
|
这里不从官方直接下载 1.1.5 的包。而是自己打一个,因为官方的 1.1.5 的包有问题,直到写这篇文章的时候还没解决。参照https://github.com/alibaba/canal/issues/3144自己打一个
docker-compose.yml
1
2
3
4
5
6
| version: '3'
services:
adapter:
build: .
volumes:
- "./conf:/opt/canal/adapter/conf"
|
修改配置文件
1
2
3
4
5
6
7
8
9
10
11
12
13
14
15
16
17
18
19
20
21
22
23
24
25
26
27
28
29
30
31
32
33
34
35
36
37
38
39
40
41
| server:
port: 8081
spring:
jackson:
date-format: yyyy-MM-dd HH:mm:ss
time-zone: GMT+8
default-property-inclusion: non_null
canal.conf:
mode: tcp #tcp kafka rocketMQ rabbitMQ
flatMessage: true
zookeeperHosts:
syncBatchSize: 1000
retries: 0
timeout:
accessKey:
secretKey:
consumerProperties:
# canal tcp consumer
canal.tcp.server.host: docker.for.mac.host.internal:11111
canal.tcp.zookeeper.hosts:
canal.tcp.batch.size: 500
canal.tcp.username:
canal.tcp.password:
srcDataSources:
defaultDS:
url: jdbc:mysql://docker.for.mac.host.internal:3306/test?useUnicode=true
username: canal
password: canal
canalAdapters:
- instance: example # canal instance Name or mq topic name
groups:
- groupId: g1
outerAdapters:
- name: logger
- name: es7
hosts: docker.for.mac.host.internal:9200 # 127.0.0.1:9200 for rest mode
properties:
mode: rest
cluster.name: elasticsearch
|
启动 canal-adapter
数据同步
创建需要同步的表
1
2
3
4
5
6
7
8
| CREATE TABLE `product` (
`id` bigint NOT NULL AUTO_INCREMENT,
`title` varchar(255) CHARACTER SET utf8 COLLATE utf8_general_ci DEFAULT NULL,
`sub_title` varchar(255) CHARACTER SET utf8 COLLATE utf8_general_ci DEFAULT NULL,
`price` decimal(10,2) DEFAULT NULL,
`pic` varchar(255) CHARACTER SET utf8 COLLATE utf8_general_ci DEFAULT NULL,
PRIMARY KEY (`id`) USING BTREE
) ENGINE=InnoDB;
|
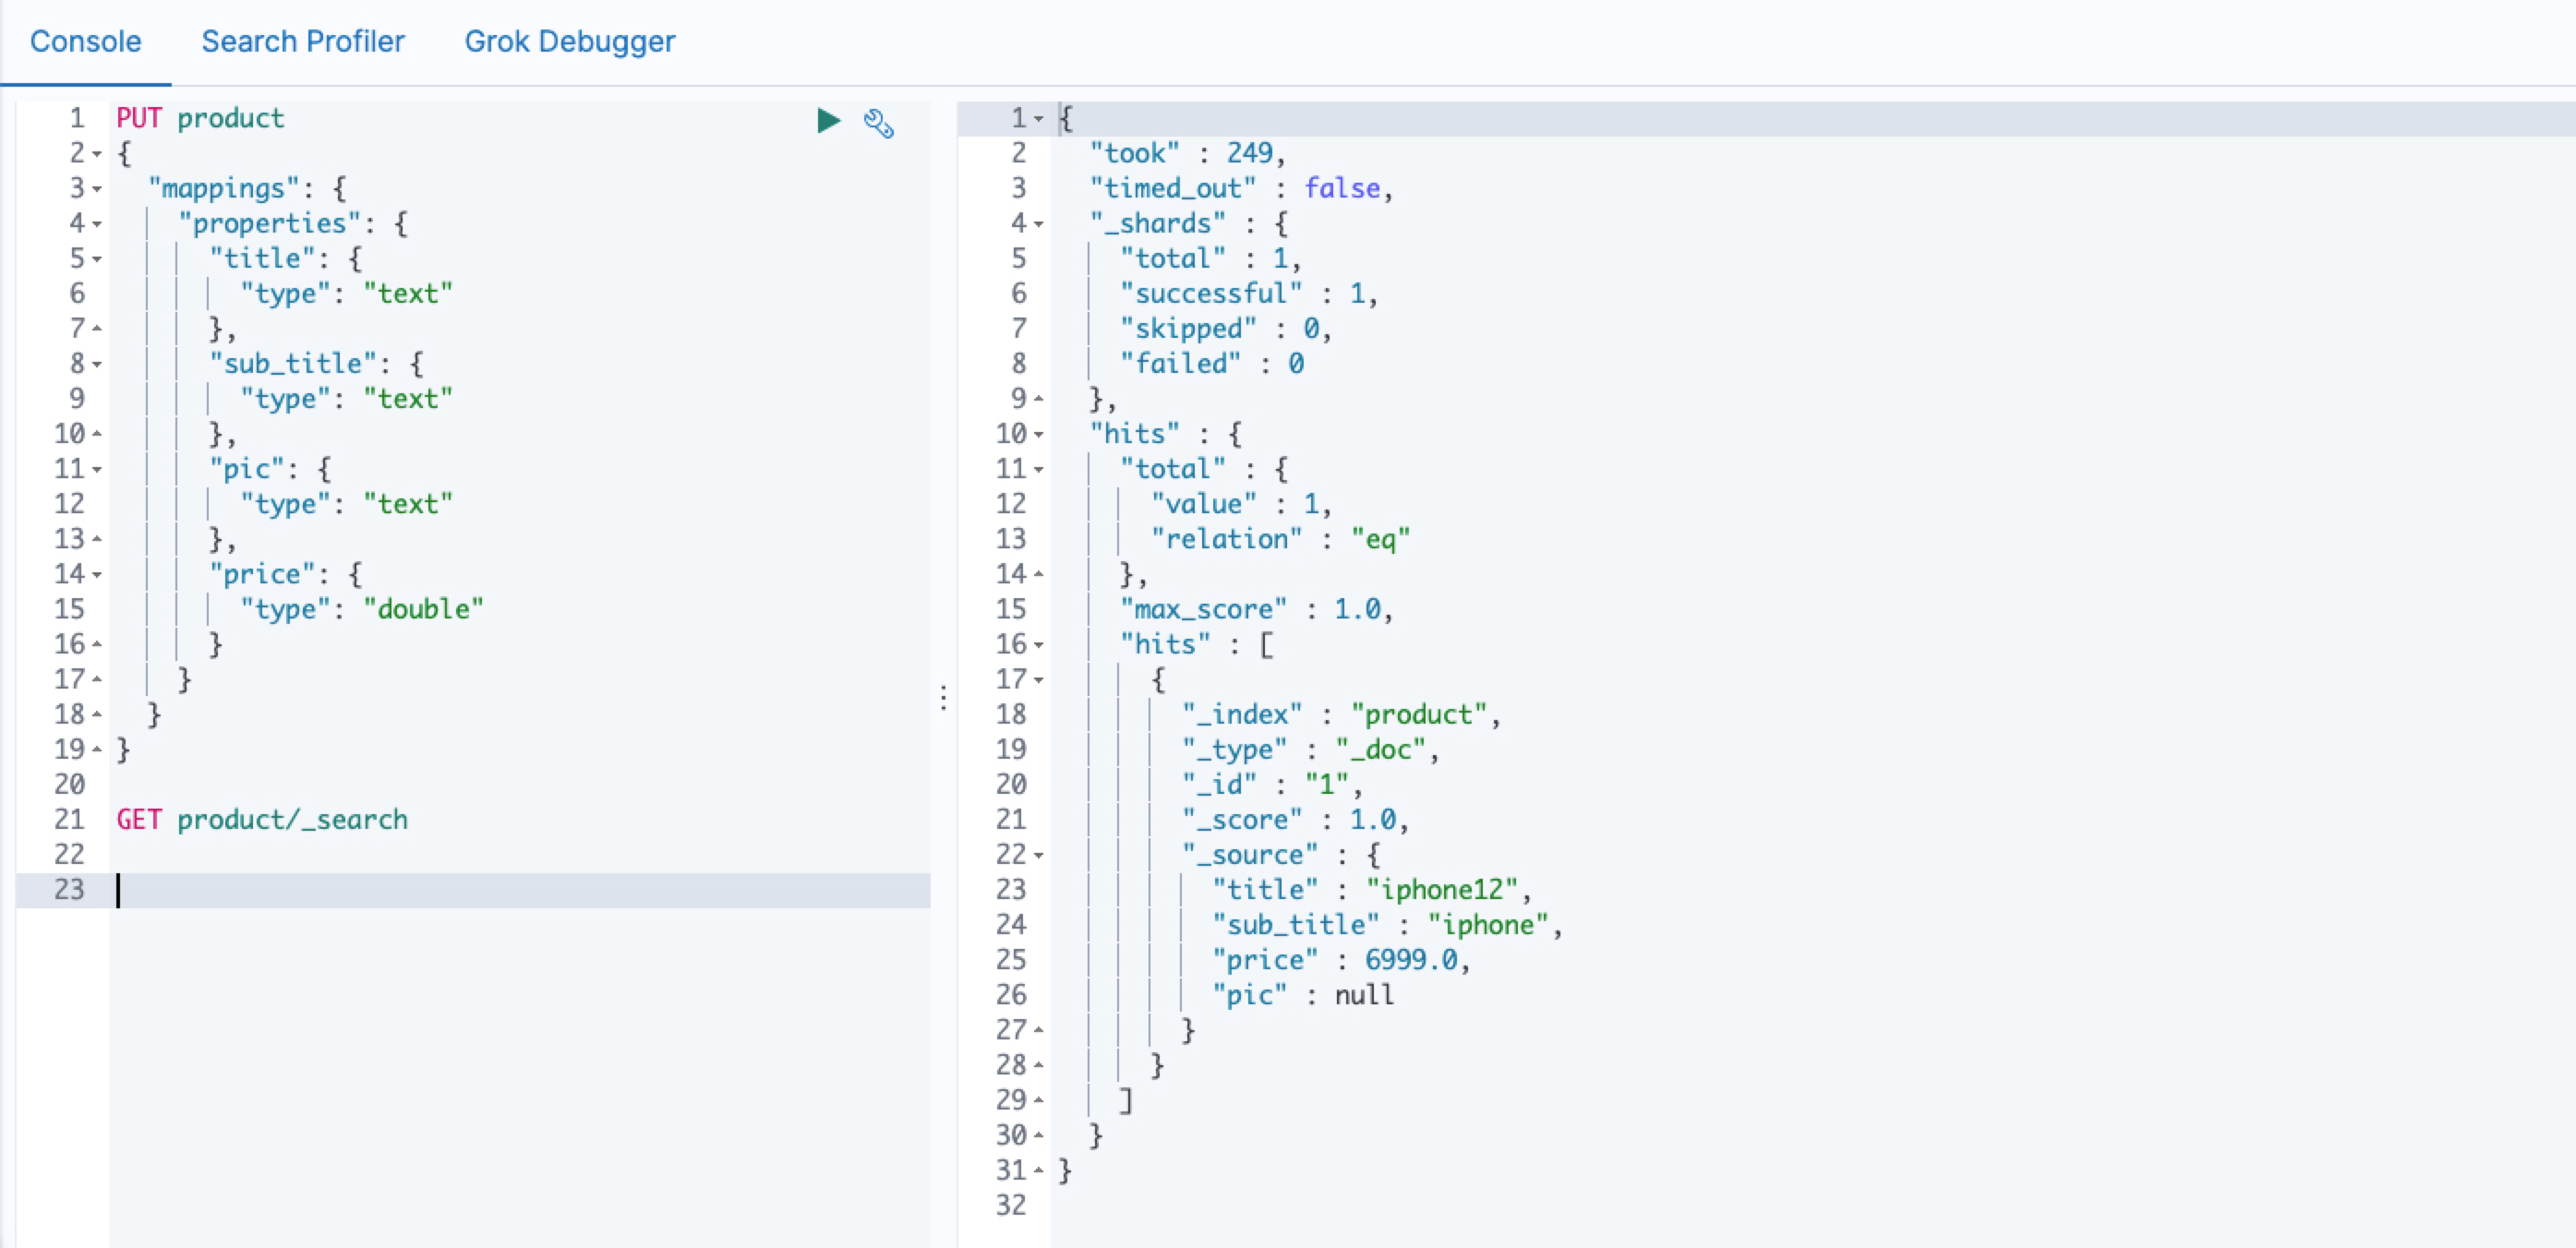
使用 kibana 创建索引
1
2
3
4
5
6
7
8
9
10
11
12
13
14
15
16
17
18
19
| PUT product
{
"mappings": {
"properties": {
"title": {
"type": "text"
},
"sub_title": {
"type": "text"
},
"pic": {
"type": "text"
},
"price": {
"type": "double"
}
}
}
}
|
修改es7/product.yml
1
2
3
4
5
6
7
8
9
10
11
12
13
14
15
16
| dataSourceKey: defaultDS
destination: example
groupId: g1
esMapping:
_index: product
_id: _id
sql: "SELECT
p.id AS _id,
p.title,
p.sub_title,
p.price,
p.pic
FROM
product p"
etlCondition: "1=1"
commitBatch: 3000
|
重启 canal-adapter
使用 mysql 插入一条数据
1
| INSERT INTO product ( id, title, sub_title, price, pic ) VALUES ( 1, 'iphone12', 'iphone', 6999.00, NULL );
|
查询 es
查询结果,可以看到已经同步成功了
 微信
微信 支付宝
支付宝